Background | If multiple TIS Board users are entitled to work on one project, normally conflicts occur because users are working with the same operators.
To avoid these conflicts projects are exported and reimported by the "other" user.
As of Version 5.5 it is possible to define a project as a Template project. If a second user logs in to one certain project, a clone of the project will be created. This clone remains even after logging out, so that the user can continue working on their project. |
Ordinary Project vs. Template Project | The difference between a classical ordinary project and a template project is that when working in TIS Board on a page that refers to a template, each user gets their own copy of this project and can work independently from the other users. This copy, further denoted as clone, remains even after logging out, so that the user can continue working on their project.
The clones are created on demand during the first access to the project and are completely isolated from the original project regarding parameters, data nodes and operators.
Note that TIS tables and files are not cloned, thus changes made to these resources are visible to all other users working on that project. |
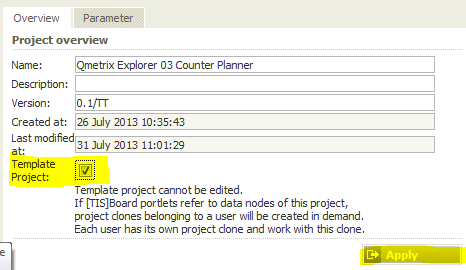
Activating the Template | Go to the project overview of the project which you would like to designate as the Template, activate the "Template Project" button and click on apply.
 |
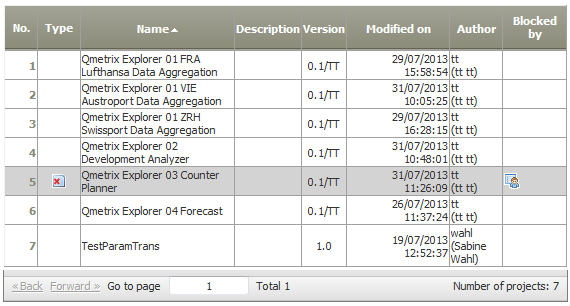
Type of a Template project | In the project overview, the project type will show which project is a template: 
|
ATTENTION | After cloning the project, it is not possible to make changes in the TIS Editor any more.
When creating Master-Portlets in TIS Board, all Portlets refer to the original project, even if the designer is working with the Clone.
If the Template Project is set back to an "ordinary" project, all clones are automatically deleted.
Parameters are stored for each user in their own copy of the template.
Portlet information about the data node is always connected to the original project. |
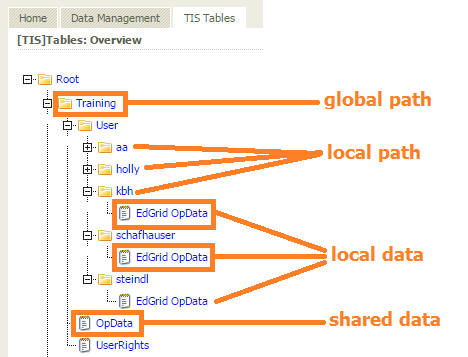
Shared Data | Use a TIS Table as a shared data storage. A key which is identified by the user partitions the table. So each user can extract a disjunctive part of the table into a local table. Use the local table to be viewed and modified by a user and finally to be stored back to the shared table. 
|
Project parameter | Create following project parameters for more generality: Parameter | Type | Value | Description |
|---|
PATH_GLOABL | string | Training | path to the shared data (TIS tables) | PATH_LOCAL | string | Training\User | path to the local data (user specific TIS tables). For each user another subfolder is created by the solution. | USER_NAME | string | | used to store the current user's name, which can be obtained by the XIH helper function XIH.UserName |
|
Project parameter recovery | Note: Project parameter values are stored for each project and user, when project clones are deleted. If a new project clone is created, then stored project parameter values are recovered. (Note: Project name in "Description" column c9 and the concerned User UserId column of the t1000.) |
Read data | Use the Importing data from SQL sources 3.1 operator for reading data natively from the database. Example: Task | SQL | Notes |
|---|
Read shared table | SELECT * From #XI.TISTable(#XI.TISPar('PATH_GLOBAL')#, 'OpData')# | - Using TIS parameters instead of explicit (hard-coded) path improves the generality and reuse for other projects. The path can be centrally modified.
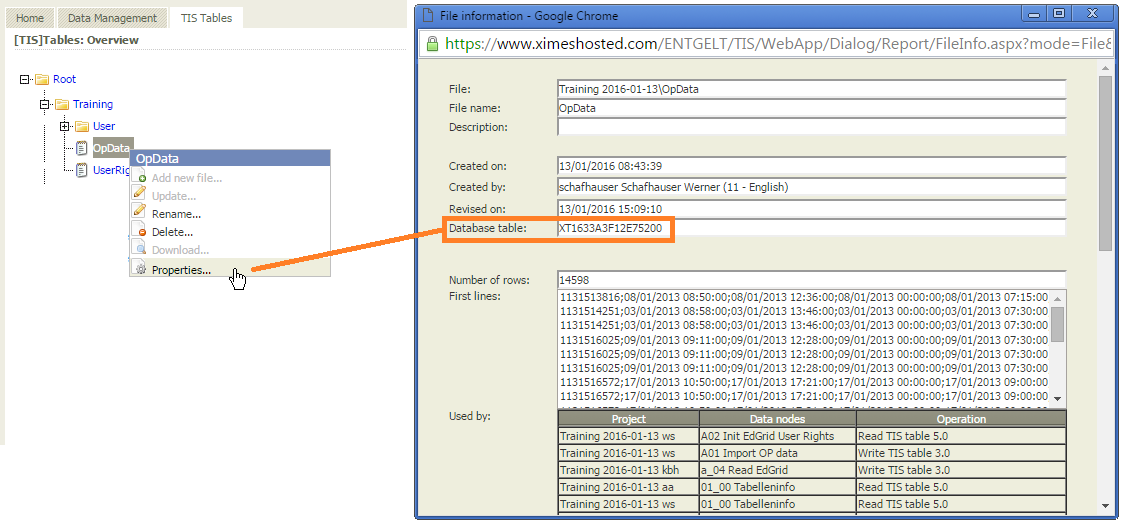
- TIS tables have internal names in the database. The names can be obtained by the XI.TISTable-function.
The internal TIS table name can be viewed in its property page: 
| Join with shared UserRights table and
select only current user's data | SELECT *
FROM #XI.TISTable(#XI.TISPar('PATH_GLOBAL')#, 'OpData')# A
JOIN #XI.TISTable(#XI.TISPar('PATH_GLOBAL')#, 'UserRights')# B
ON A.C6 = B.C0
WHERE B.C1 = #XI.TISPar('USER_NAME')# | Here Table OpData has alias A and UserRights has alias B. The common columns are C6 in OpData and C0 in UserRights. Selects only rows with column C1 containing the current user name. | Rename the columns | SELECT
A.C0 AS "Aufnahmenummer",
A.C1 AS "Erster_Schnitt",
A.C2 AS "Letzte_Naht",
A.C3 AS "OP_Datum",
A.C4 AS "Beginn_OP",
A.C5 AS "Ende_OP",
A.C6 AS "OP_Saal",
A.C7 AS "Person",
A.C8 AS "Personen_Nr",
A.C9 AS "Funktion",
A.C10 AS "Key" FROM #XI.TISTable(#XI.TISPar('PATH_GLOBAL')#, 'OpData')# A
JOIN #XI.TISTable(#XI.TISPar('PATH_GLOBAL')#, 'UserRights')# B
ON A.C6 = B.C0
WHERE B.C1 = #XI.TISPar('USER_NAME')# | Due to database's performance, columns have very short names internally. Here C0..C10; Using the Rename, reorder and delete columns operator, columns can be renamed, but data will be duplicated this way. In order to improve the performance, rename the columns during importing data by SQL. |
|


