TIS Project
A TIS Project is where calculations take place. A TIS Project aims at converting input data to a set of tables or graphs containing the data or parts of it in a desired format.
A TIS Project consists of a set of data nodes and a set of parameters. A data node contains a sequence of operations resulting in its result table.
Data nodes can be connected to one another in two ways. The result table of one data node can serve as input table for the first operation of another data node, and operations of one data node can take as input result tables of other data nodes. See Update process between data nodes for details.
Learn more...
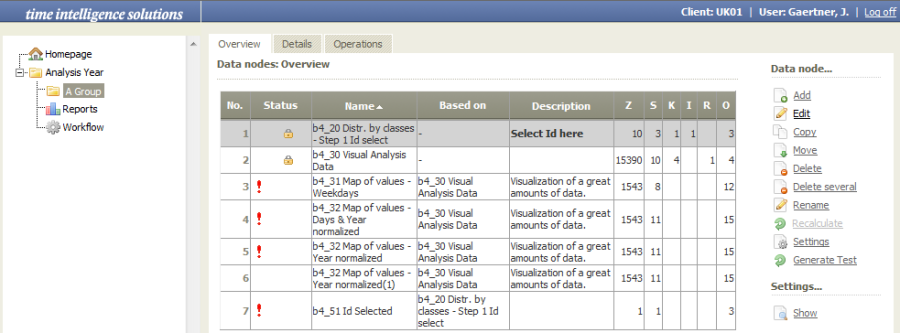
The screenshot below shows the main working area of a project – a list of its data nodes. The order of the data nodes in this list is alphabetical according to their names.
- Number: The number of the node. This number does not have any particular functionality. (Data nodes are referenced by their names.)
- Status: Contains symbols abbreviating the status of the data node (see Status Symbols for a description of the symbols).
- Name: Name of the data node. As a convention, they start with some letter and number indicating their dependencies. E.g., data node b4_31 depends on b4_30. The name of a data node must be unique within its TIS Project. It also is the anchor for references to the data node.
- Based on: Name of the parent node, "–" if there is no parent node.
- Description: Description of the data node.
- Z (R in English version): Number of rows of the result table.
- S (C in English version): Number of columns of the result table.
- K (Ch in English version): Number of direct children, i.e., number of data nodes that directly depend on this data node.
- I: Number of data nodes that refer to this data node via operations. Tooltip shows list of data nodes.
- R (IRef in English version): Number of data nodes that this data node refers to via operations. Tooltip shows list of data nodes.
- O: Number of operations in this data node. Tooltip shows list of operators.
The data nodes can be organised in different folders in the leftmost area, e.g., here only folder "A Group".

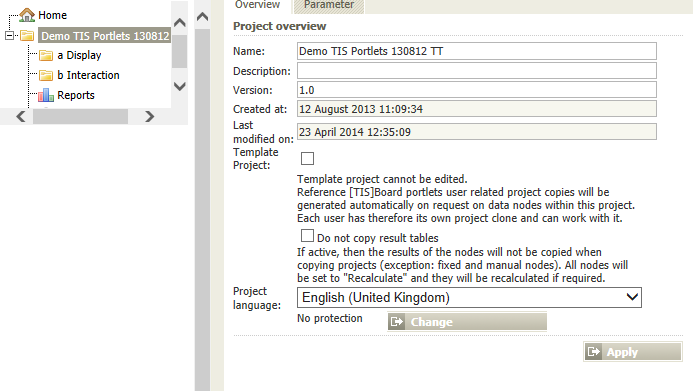
Selecting the project name in the leftmost column gives access to the project's settings. The following information can be entered, as shown in the screenshot below.
- Name, description and version number,
- activation as template project, (see also Working with Template Projects)
- for a copied project, whether the result tables should also be copied,
- the project language (if the language is not available the client default is chosen). Changes standard column names and number formatting (see also Localization),
- a password protection for editing and exporting the project.

See also How to Manage TIS Projects
