1 | - Extract zip to C:\Install
|
|
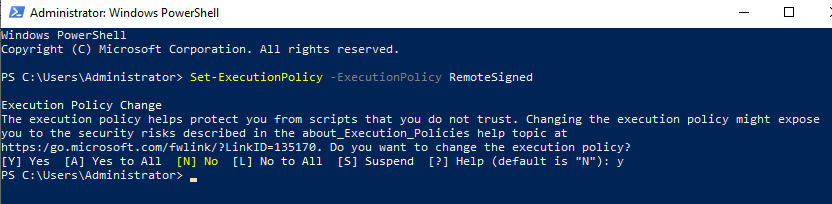
2 | - Run Powershell as Administrator and execute the following command
| |
3 | - Go to the extracted folder. Unblock files if downloaded from the Internet
| |
4 | - Execute TISInstaller.exe as Administrator
|
|
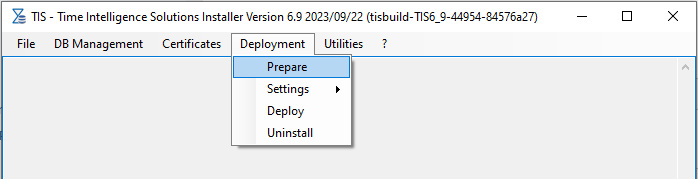
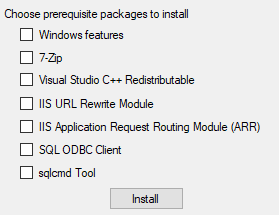
5 | - On a new Windows Machine prerequisites have to be installed using the Deployment/Prepare command
- Select all items in dialog
- select sqlcmd only for MSSQL
| |
| Prepare.ps1 might exit with error: Please check whether you have access to the internet. If it is not the case, you will need to install .NET Framework 3.5 offline using your Windows installation DVD. | |
6 | | |
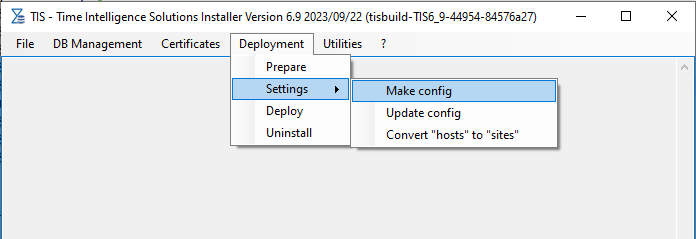
7 | - select Make config in Deployment menu
| |
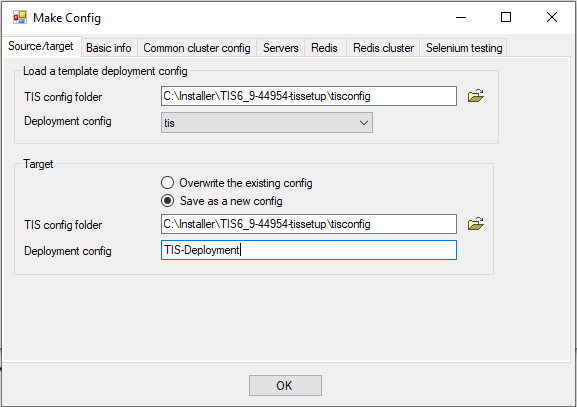
8 | - create a new tisconfig and select tis as template machine
- choose whether you want to overwrite the template or create an individual folder in tisconfig (or elsewhere, ajdust the path). In the latter case, name the folder of your deployment configuration (usually your hostname).
| |
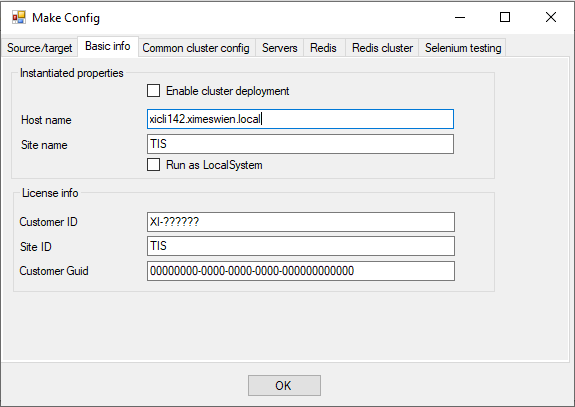
8a | - switch to the "Basic info" tab.
- enter your host name and site name
- enter your license information
- in case of a cluster deployment, tick the "Enable cluster deployment" option
| |
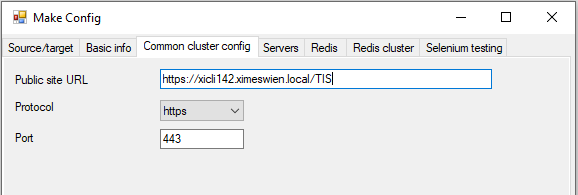
8b | In case of a cluster deployment: - switch to "Common cluster config" tab and fill in the form
- switch to "Servers" tab and add a new host by clicking on "Add" button. Fill in the host name, IP address and instance count in the table on the right. Adjust First APPID and port. Tick "Selenium testing" option if needed.
- It is possible to specify additional attributes for TIService, TISBoard and EMail in their respective tabs. For more information see TIService Settings.
| |
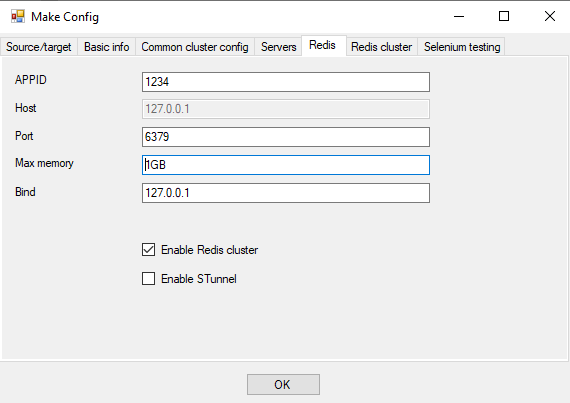
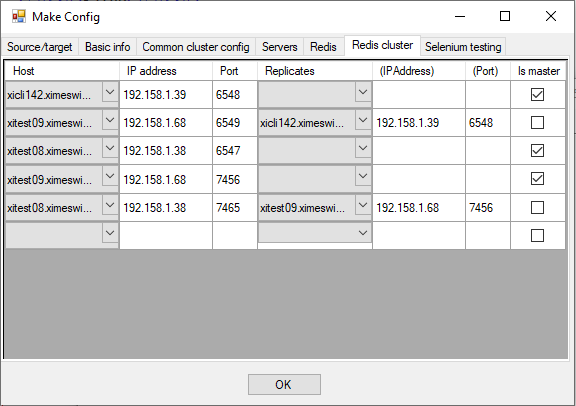
8c | - should Redis or Redis cluster be enabled, fill in APPID on "Redis" form and tick "Enable redis cluster" option.
- switch to "Redis cluster" tab and define master nodes and replicas. Note that the number of master nodes must be odd and start from 3.
| 
|
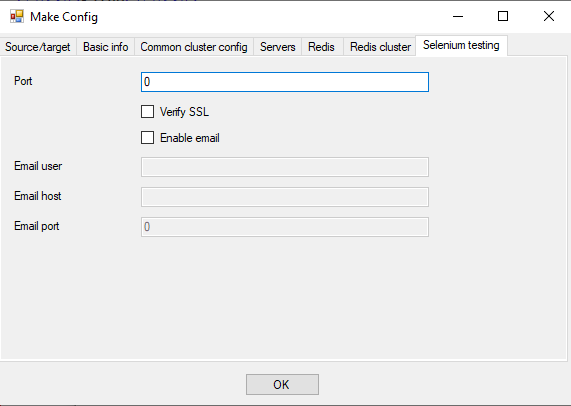
8d | - should Selenium testing be enabled, switch to "Selenium testing" tab and fill in the form
| |
8e | OPTIONAL: Change site name (after the config has been created) - default is TIS
- adapt values of <Name> and <PublicSiteUrl> tags in tisconfig\deploymentconfigs\<yourhostname>\settings.xml
- adapt TISBoardSettings.js
- TISBoard.MAINCONNECTURL = "/<sitename>/TISBoard/DispatcherService.svc';
- TISBoard.SitePatch = '/<sitename>';
- adapt EditorSettings.js
- window.EditorSettings.site_path = "<sitename>";
|
|
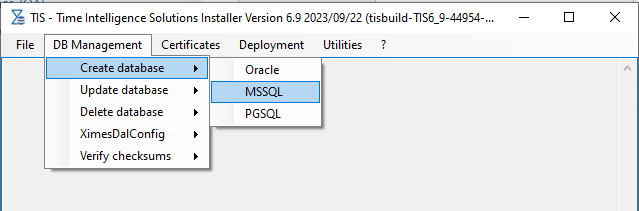
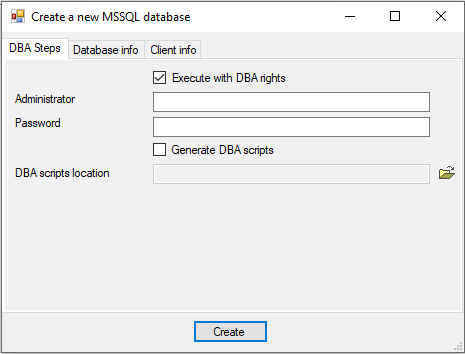
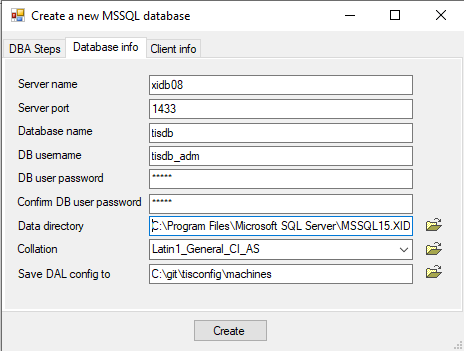
9a | - create a new database TISDB for MSSQL
- enter default TISAdmin username
- as a result specified user has CLIENTADMINISTRATOR role
- has permission for User Management
- enter server and database names
- enter a password for the database user
- by Data directory and Collation if the Server name is already filled in, clicking on the browse icon will set the default values taken over from the server
- select target folder for ximesdalconfig.xml by selecting your tisconfig/deploymentconfigs/<yourhostname> folder (see 9* below)
 do not change client ID "01" (must be synchronized with other config files) do not change client ID "01" (must be synchronized with other config files)- if Administrator and Password left empty, the Windows domain user will be used for the DB login
- if the encripted ximesdalconfig.xml.s is being used, it can only be decripted on the same computer, where it was created.
Copying it to an other machine will result TIService not to start.
| |
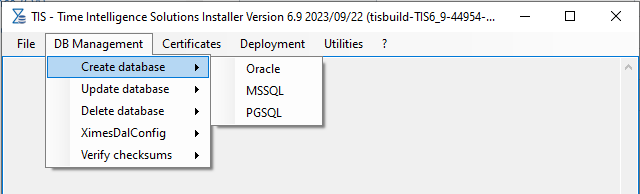
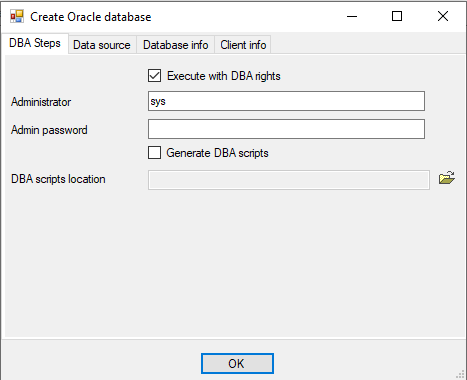
9b | - create a new database TISDB for Oracle
- enter default TISAdmin username
- user must be available in the specified identity server
- as a result specified user has CLIENTADMINISTRATOR role
- has permission for User Management
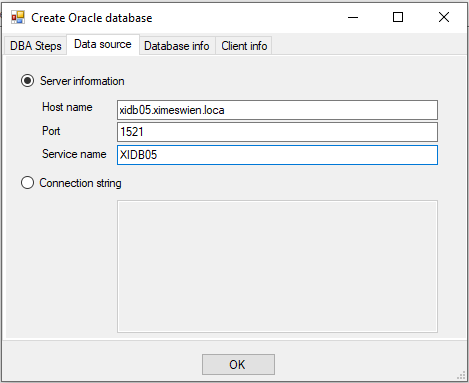
- enter data source information via connection string or server information
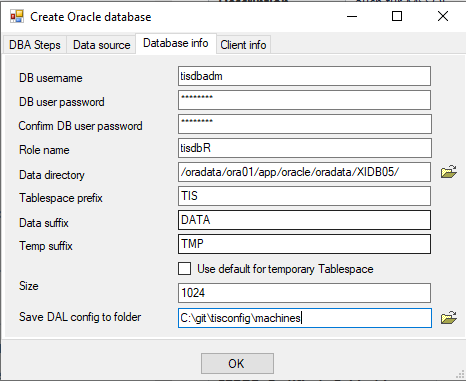
- enter database name
- enter a password for the database user
- enter role name and tablespace prefix
- select target folder for ximesdalconfig.xml by selecting your tisconfig/deploymentconfigs/<yourhostname> folder (see 9* below)
- do not change client ID "01" (must be synchronized with other config files)
| |
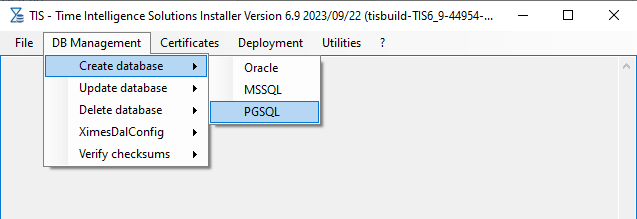
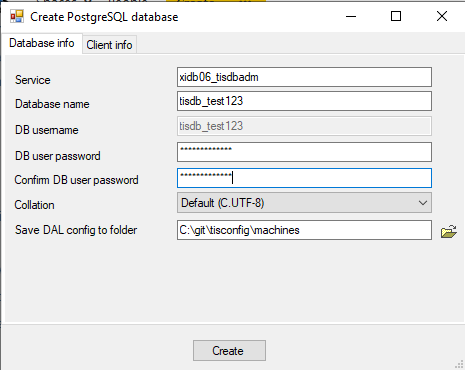
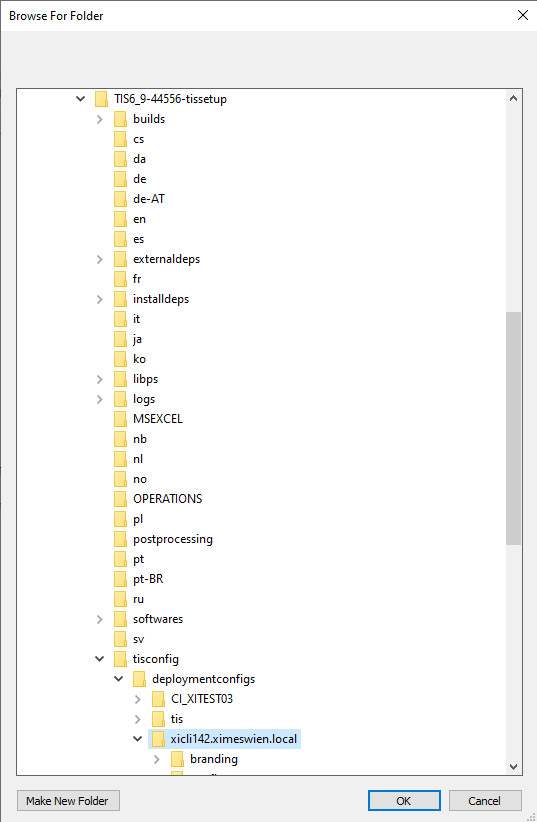
9c | - create a new database TISDB for PGSQL
- enter service name
- enter database name
- enter a password for the database user
- select target folder for ximesdalconfig.xml by selecting your tisconfig/deploymentconfigs/<yourhostname> folder (see 9* below)
- do not change client ID "01" (must be synchronized with other config files)
| |
9* | - select target folder for ximesdalconfig.xml by selecting your tisconfig/deploymentconfigs/<yourhostname> folder
| |
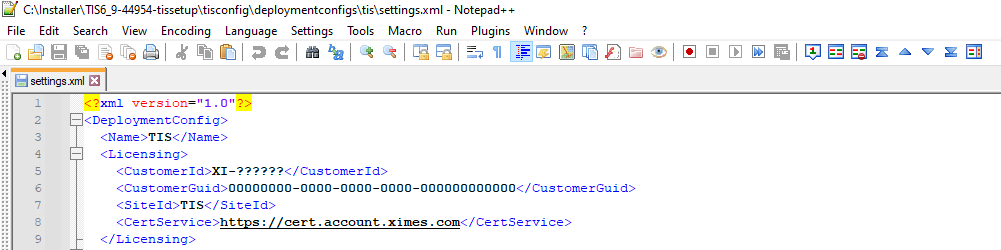
10 | OPTIONAL adapt the tisconfig\deploymentconfigs\<yourhostname>\settings.xml - optionally set DeploymentConfig\Name to another name for the base path in the resulting URL
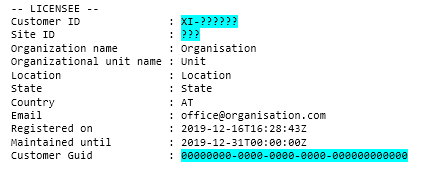
- use your License-Info file for following settings
- set SiteConfig\Licensing\CustomerId
- set SiteConfig\Licensing\CustomerGuid
- set SiteConfig\Licensing\SiteId
| |
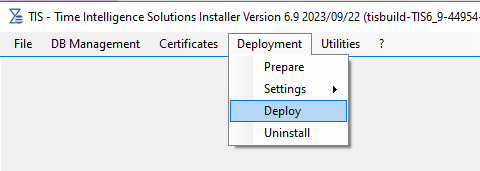
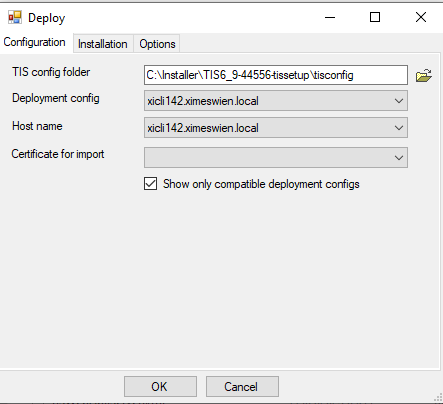
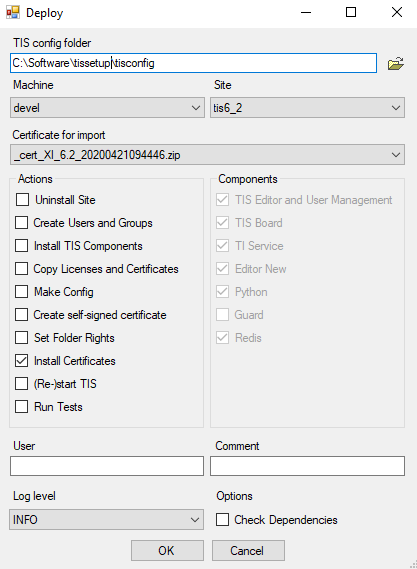
11 | deploy TIS software: - select deployment configuration and host name from tisconfig folder
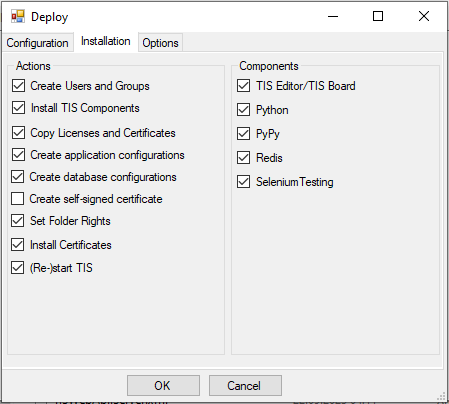
- in "Installlation" tab select actions and components
- optionally select Create a self-signed certificate for SSL
- In the case of offline deployment without an internet connection, untick Install Certificates and follow the instructions at step 12
| |
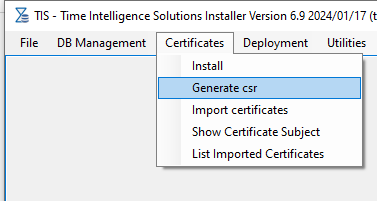
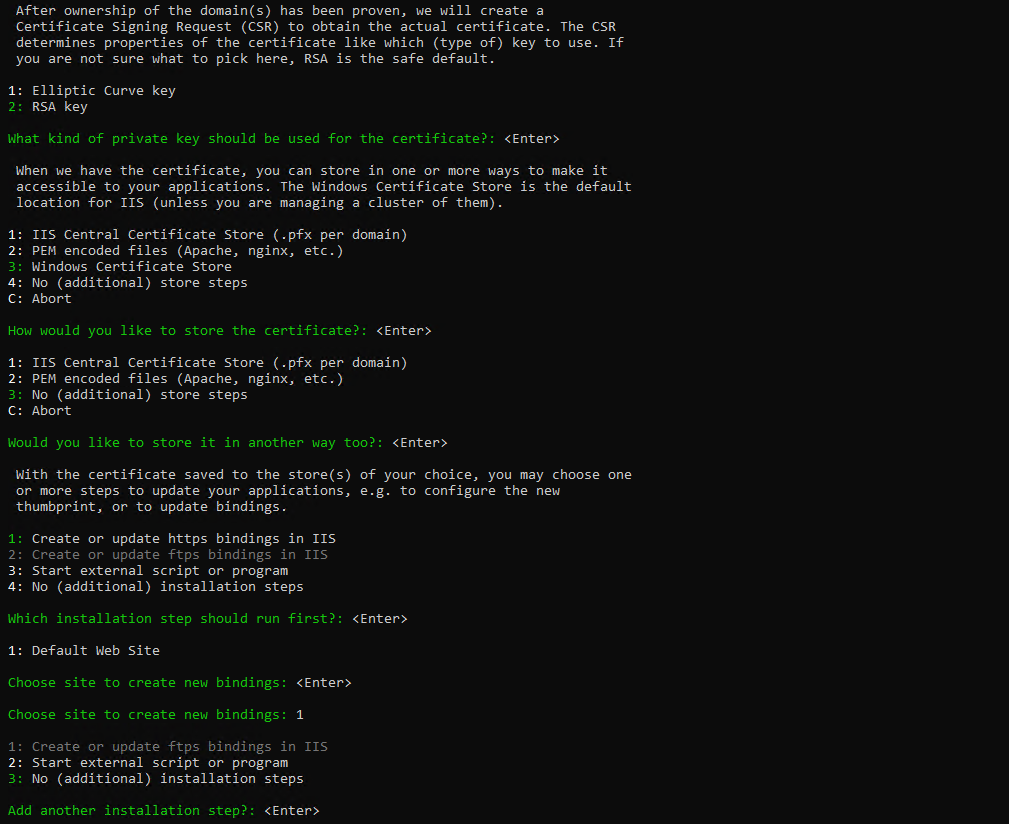
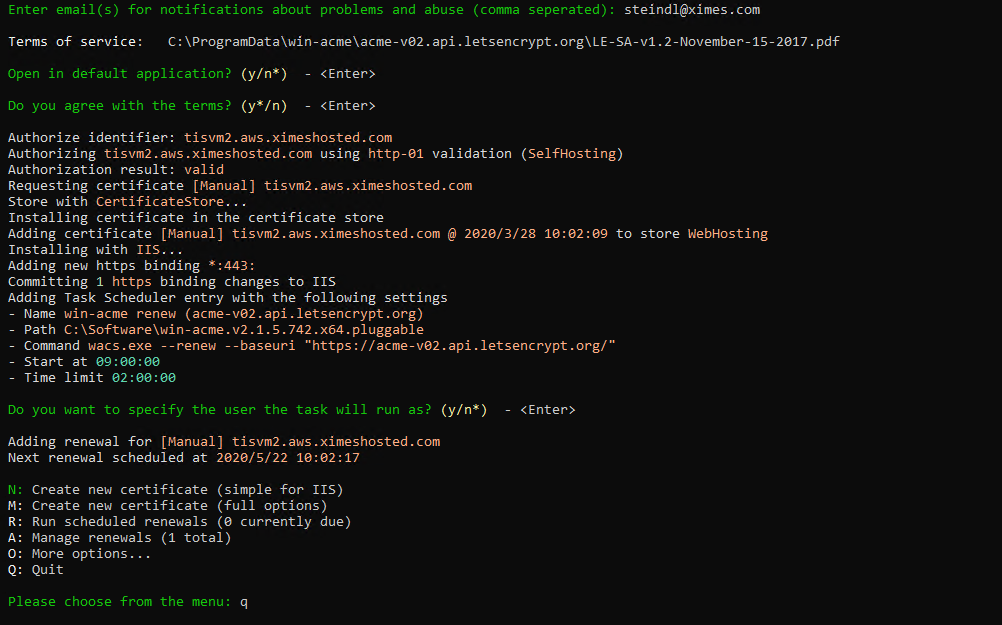
12 | Certificate installation for offline deployment (optional) - Use the option Generate CSR
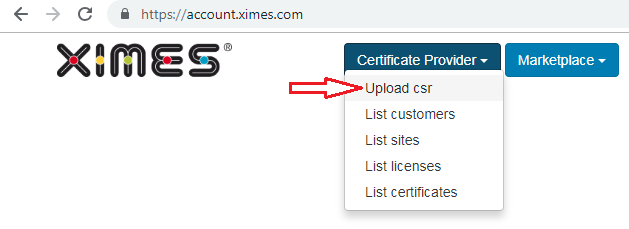
- Upload CSR and download certificate (zip):
- Select Certificate provider and click on Upload csr
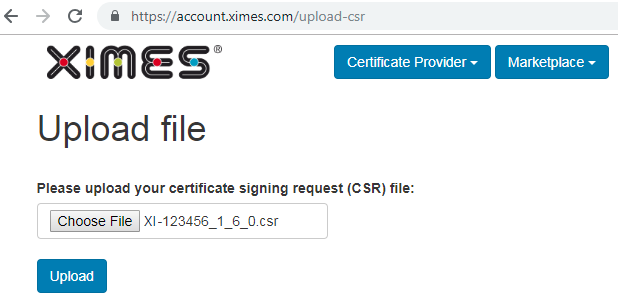
- Upload your certificate signing request file
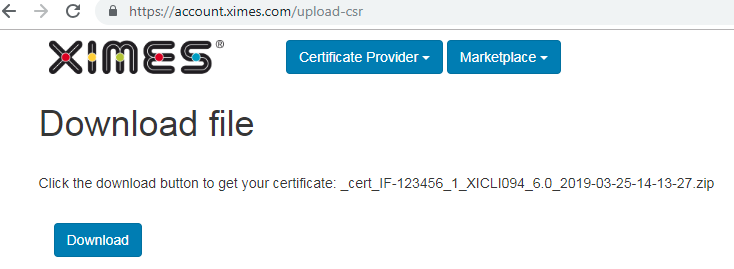
- Download your certificate in ZIP format
- Copy the downloaded Certificate into C:\ProgramData\XIMES\TIS\!!!hostname\!!!sitename\
- Run deployment again but only tick Install Certificates and untick everything else
- From the Certificate for Import dropdown list select your Certificate.
|
|
13 | | |